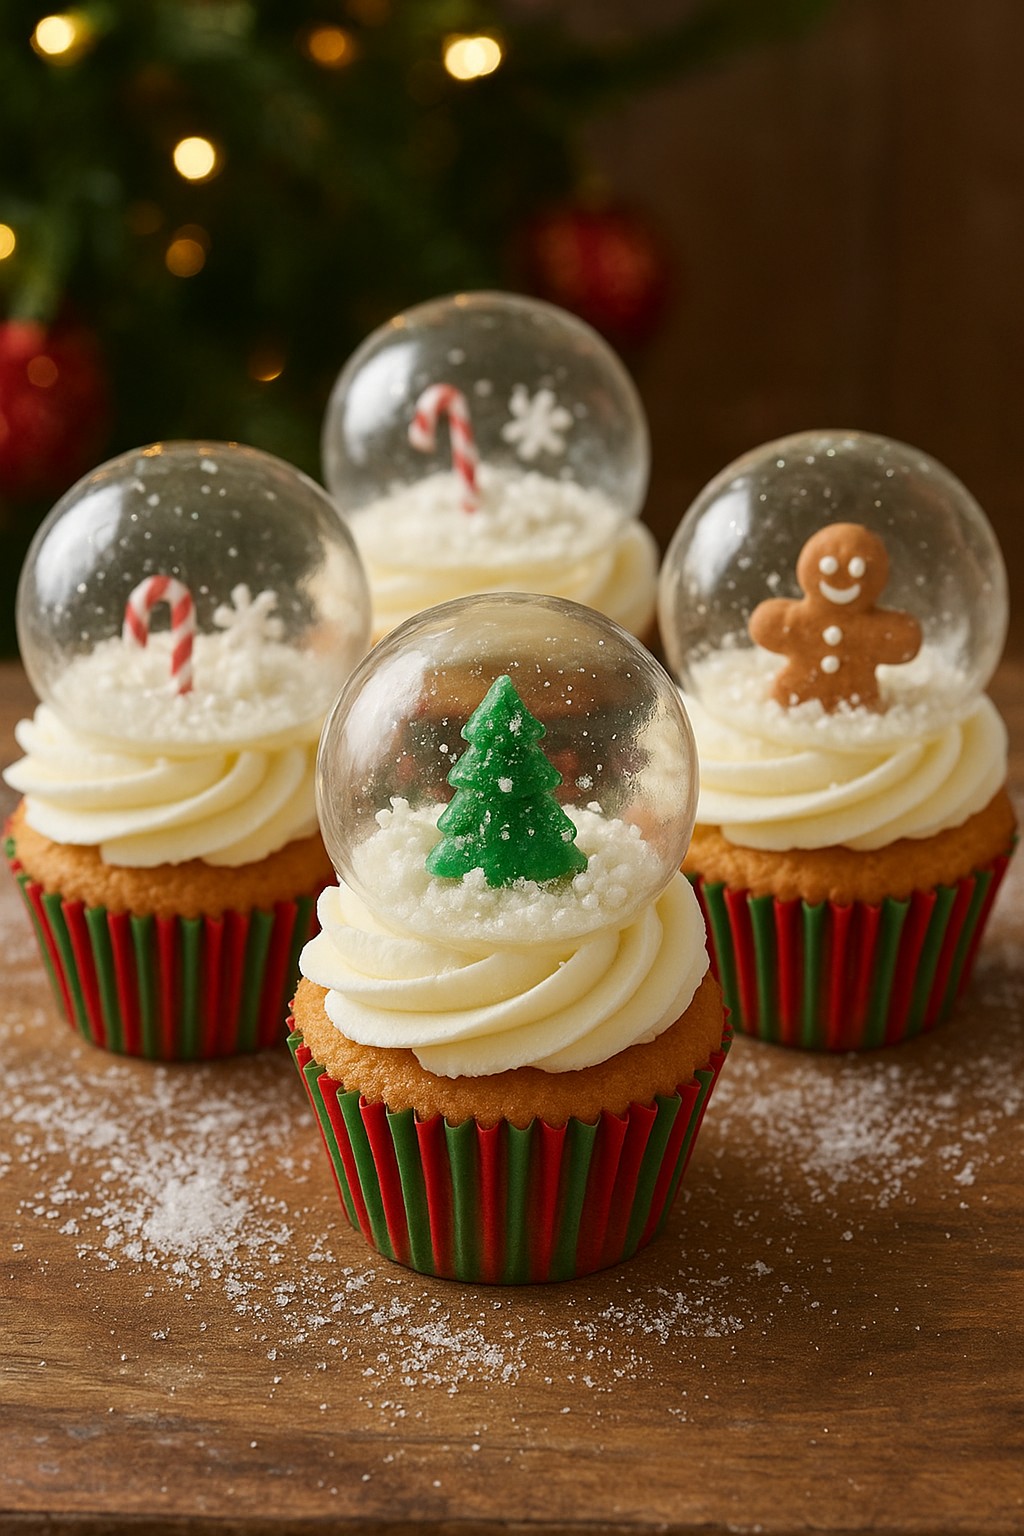
❄️ Christmas Snow Globe Cupcakes (with Clear Gelatin Domes!)

These Christmas Snow Globe Cupcakes are pure magic. Each cupcake is topped with a sparkling, crystal-clear gelatin dome that creates the look of a tiny winter wonderland. Inside, you can decorate with candy trees, sprinkles, edible glitter, gingerbread men, or any mini festive decorations you love.
They’re stunning on a dessert table, unforgettable for Christmas parties, and surprisingly doable with the right method. These whimsical little snow globes will instantly become a holiday baking tradition!
⭐ Why You’ll Love This Recipe
- Show-stopping Christmas dessert — They look like tiny edible ornaments.
- Customizable — Create different scenes in each dome.
- Kid-friendly decorating — Kids adore making mini winter worlds!
- Perfect for gifting — Beautiful and unique.
🎄 Ingredients:
-Cupcakes
(Feel free to use your favorite vanilla cupcake recipe; here’s a great one.)
- 1 ½ cups all-purpose flour
- 1 ½ tsp baking powder
- ¼ tsp salt
- ½ cup unsalted butter, softened
- 1 cup granulated sugar
- 2 large eggs
- 2 tsp vanilla extract
- ½ cup whole milk
-Buttercream
- 1 cup unsalted butter, softened
- 3 cups powdered sugar
- 2–3 tbsp heavy cream or milk
- 1 tsp vanilla extract
- Pinch of salt
-Gelatin Domes
- 4 packets unflavored gelatin
- ½ cup cold water
- ½ cup very hot water
- Large round silicone molds (2.5–3.5 inches wide)
- Nonstick spray
- Small paintbrush (optional)
- Silicone molds
- Measuring cups / spoons
- Bowl
- Wire rack
- Large bowl
- Electric mixer
- Whisk
- Spatula
- Christmas Cupcake Liners
- Piping bag with tip
For Decorating the Snow Globe Scene
Choose any combination you like:
- Mini candy canes
- Candy trees
- Sprinkles shaped as snowflakes or stars
- Edible glitter
- Tiny gingerbread men candies
- Miniature fondant decorations
- White sanding sugar for “snow”
🎁 Instructions
1. Make the Gelatin Domes (Do This First — They Need to Dry Overnight!)
- Lightly spray the outside of the silicone molds with nonstick spray. Wipe off excess so they’re only barely coated.
- In a bowl, mix ½ cup cold water with the gelatin. Let it bloom for 5 minutes.
- Add ½ cup very hot water and stir until fully dissolved and clear.
- Let the mixture sit for a few minutes until bubbles rise. Skim off the foam.
- Dip each mold halfway into the gelatin and lift slowly.
- Place the molds upside down on a wire rack to drip.
- Repeat dipping 2–3 more times, allowing a few minutes between layers for strength.
- Let gelatin dry overnight, uncovered, until firm.
- Carefully peel domes off the molds.
Tip: If sides warp, gently trim edges with clean scissors.
2. Bake the Cupcakes
- Preheat oven to 350°F (175°C).
- Line a muffin tin with Christmas liners.
- Whisk together flour, baking powder, and salt.
- Beat butter and sugar until light and fluffy.
- Add eggs one at a time, mixing well.
- Mix in vanilla.
- Add dry ingredients and milk alternately, mixing gently.
- Divide batter evenly into cups.
- Bake 18–20 minutes, or until a toothpick comes out clean.
- Cool completely.
3. Make the Buttercream
- Beat butter until creamy.
- Add powdered sugar a little at a time.
- Add vanilla, salt, and cream.
- Beat until smooth and fluffy.
- Pipe a tall swirl on each cupcake (the dome sits on top!).
4. Create the Snow Globe Scene
Place decorations directly onto the buttercream swirl:
- Stand up a small candy tree
- Add snowflakes or edible glitter
- Sprinkle sanding sugar
- Add a tiny gingerbread man
- Create a snowy mound in the center
Each cupcake becomes its own mini world!
5. Top with the Gelatin Domes
Very gently:
- Lift dome using clean, dry hands.
- Set it directly over the decorations, pressing lightly into the frosting to secure.
- Avoid touching the dome too much — fingerprints show on clear gelatin.
The moment the dome sits over the scene, the snow globe magic appears!
✨ Tips for Perfect Snow Globe Cupcakes
- Do NOT refrigerate finished cupcakes — condensation will cloud the domes.
- Store at cool room temperature.
- Make domes 1–2 days ahead for stress-free assembling.
- Buttercream must be firm enough to hold the decorations and dome.
- If domes look dull, lightly brush with a tiny amount of vegetable oil for shine.

🎅 Storage
- Store cupcakes at room temperature for up to 24 hours.
- For longer storage, keep cupcakes un-domed; add domes before serving.
Please check out more of my amazing recipes:
Please leave a review, and share the recipe with friends to spread Christmas joy.
Merry Christmas!
Where to get gelatin dome molds?
You actually have three great options, depending on what look you want:
✅ Option 1: Use small silicone half-sphere molds (the easiest & most common)
Look for silicone hemisphere molds in sizes 2.5–3 inches (6–7.5 cm).
These are sold everywhere:
- Amazon: “silicone half sphere mold”
- Michael’s / Hobby Lobby
- Walmart
- Baking supply stores
These are the #1 choice for snow globe cupcakes because the gelatin peels off easily.
✅ Option 2: Use balloon molds
This is the old-school method.
You inflate small water balloons, dip them in liquified gelatin several times, dry them overnight, and then pop/remove the balloon.
Pros:
- Inexpensive
- Easy to find
Cons:
- Slightly more fragile
- Takes more time to set
✅ Option 3: Acrylic or plastic half-domes (used as shaping guides)
These are NOT edible molds, but you pour the gelatin over the outside of the dome to create a perfect shape.
Search for:
- “clear acrylic half dome ornaments”
- “plastic ornament halves for crafting”
These make very uniform domes!
⭐ Best size for cupcakes
Choose molds in the range of:
- 2.5 inch / 65 mm → fits beautifully on standard cupcakes
- 3 inch / 75 mm → for extra dramatic snow globes
💡 Extra Tips for Perfect Gelatin Domes
- Lightly oil the molds so the gelatin releases without cracking.
- Let them dry at least 8–12 hours.
- Store them somewhere dry — humidity melts them.
- If using balloons, dip them 3–4 times for strong structure.
❄️ Gelatin Dome Troubleshooting Guide
Here are the most common problems and the exact fix for each one.
❌ Problem 1: Cloudy or foggy domes
Causes:
- Gelatin got too hot
- Foam wasn’t skimmed
- Condensation (stored in fridge)
- Humidity in kitchen
Fix:
- Use very hot water, not boiling
- Let bubbles rise, then skim foam
- Never refrigerate domes
- Work in a dry room
Quick Trick: Brush lightly with a tiny amount of vegetable oil — restores shine.
❌ Problem 2: Domes crack when removing from molds
Causes:
- Not enough layers dipped
- Dried too little
- Mold surface too sticky
Fix:
- Dip 3–4 layers
- Dry at least 8 hours
- Ensure molds are lightly (not heavily!) coated in oil
❌ Problem 3: Domes collapse or warp
Causes:
- Too thin
- Humidity
- Gelatin mixture too warm when dipping
- Over-handling with warm hands
Fix:
- Add extra dipping layers
- Let gelatin cool slightly before dipping (but not set)
- Store in a dry place
- Use gloves to prevent fingerprints + heat transfer
❌ Problem 4: Visible fingerprints on domes
Cause: Natural oils on your hands mark the shiny surface.
Fix:
- Handle by edges only
- Wear disposable gloves
- If needed, VERY lightly buff with a drop of oil to restore shine
❌ Problem 5: Streaks or uneven texture
Causes:
- Too much oil on molds
- Gelatin not fully dissolved
- Bubbles not skimmed
Fix:
- Wipe molds almost completely dry after spraying
- Stir gelatin thoroughly
- Skim foam before dipping
❌ Problem 6: Gelatin won’t stick to mold during dipping
Causes:
- Mold too oily
- Gelatin too cool and thick
- Mold surface too smooth
Fix:
- Wipe molds nearly clean
- Rewarm gelatin slightly
- Dip at a straight angle and lift slowly
❌ Problem 7: Domes melt or become sticky
Causes:
- Refrigeration
- High humidity
- Warm environment
Fix:
- Store at room temp in a dry room
- Run a dehumidifier if needed
- Add a slightly thicker layer via extra dipping
❌ Problem 8: Domes stick together when stored
Cause: Gelatin surfaces touch and fuse.
Fix:
- Store domes not touching each other
- Place each on its own parchment square
Leave a Reply