Shamrock Sugar Cookies (With Royal Icing)

Soft, buttery Shamrock Sugar Cookies decorated with glossy royal icing are the ultimate Saint Patrick’s Day treat! These cookies hold their shape beautifully, taste amazing (not just pretty!), and are perfect for gifting, parties, or festive dessert tables.
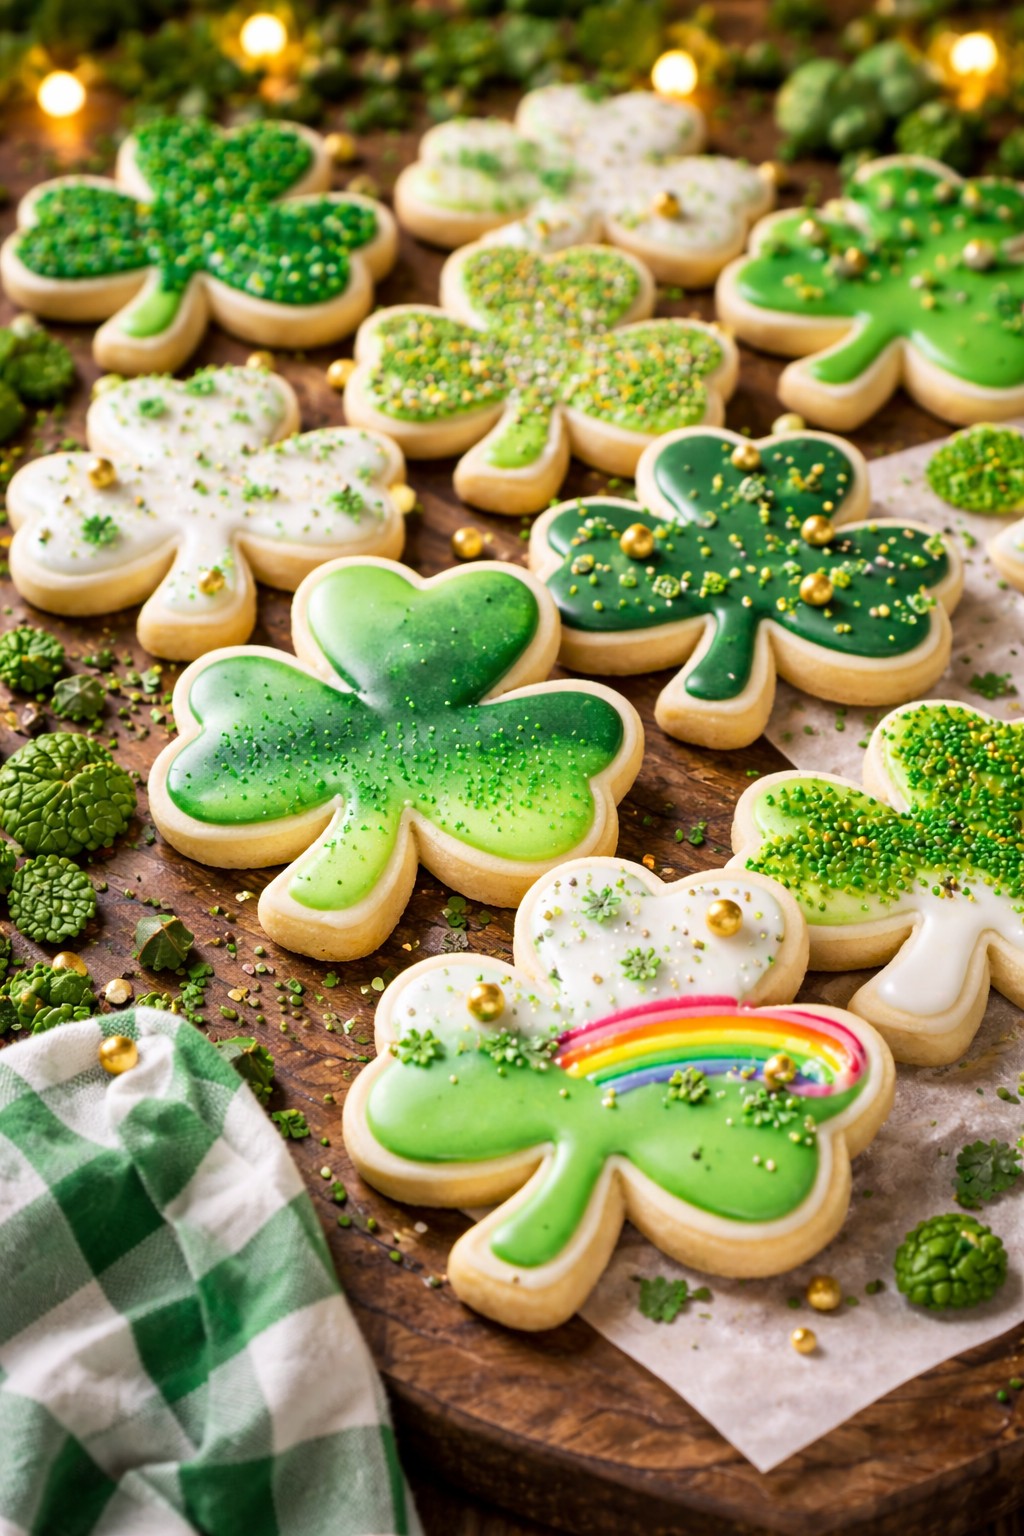
Whether you keep them classic green or go all out with gold sprinkles and shamrock details, these cookies are guaranteed to bring a little luck to your kitchen. 🍀
Why You’ll Love These Cookies
- Soft centers with lightly crisp edges
- Dough holds shape perfectly when cut
- Not overly sweet (balances beautifully with royal icing)
- Perfect for decorating with kids or for elegant cookie platters
- Make-ahead friendly
Shamrock Sugar Cookies
Ingredients
For the Cookies:
- 1 cup unsalted butter, softened
- 1 cup granulated sugar
- 1 large egg
- 1 teaspoon vanilla extract
- ½ teaspoon almond extract (optional but lovely!)
- 2 ¾ cups all-purpose flour
- 1 teaspoon baking powder
- ½ teaspoon salt
For Royal Icing:
- 4 cups powdered sugar
- 3 tablespoons meringue powder
- 5–6 tablespoons warm water
- ½ teaspoon vanilla or almond extract
- Green gel food coloring
- Measuring cups / spoons
- Baking sheets
- Large bowl
- Electric mixer
- Bowl
- Whisk
- Spoon
- Rolling pin with Spacer (optional)
- Shamrock cookie cutter
- Wire cooling rack
- Piping bag with tips
- Scribe tool
- Green sanding sugar
- Gold sprinkles
- Green sprinkles
- Edible gold leaf
- Edible gold leaf flakes
- Edible gold luster dust
- Gold sugar pearls
- Small food-grade paintbrush
How to Make Shamrock Sugar Cookies
1. Make the Dough
In a large bowl, cream butter and sugar until light and fluffy (2–3 minutes) using an electric mixer.
Add egg, vanilla, and almond extract. Mix until combined.
In a separate bowl, whisk flour, baking powder, and salt. Gradually add dry ingredients to wet ingredients until a soft dough forms.
2. Chill
Divide dough in half, flatten into discs, wrap in plastic wrap, and chill for at least 1 hour.
3. Roll & Cut
Preheat oven to 350°F.
Roll dough to ¼-inch thickness on a lightly floured surface using rolling pin with spacer (for even thickness to prevent burning).
Cut with shamrock cookie cutters and transfer to lined baking sheets.
4. Bake
Bake 8–10 minutes, until edges are just barely golden.
Cool completely on wire cooling rack before decorating.
Royal Icing (Perfect for Decorating)
1. Mix
In a large bowl, beat powdered sugar, meringue powder, and 5 tablespoons water on low speed until combined using an electric mixer.
Increase to medium-high and beat 3–4 minutes until glossy and stiff peaks form.
Add more water (a few drops at a time) to reach desired consistency:
- Thick (outline) – toothpaste consistency
- Flood (fill) – honey consistency
Add green gel food coloring and mix until evenly tinted.
2. Decorate
Pipe outline first using piping bag, let set slightly, then flood the center. Use a toothpick to smooth icing.
Let dry 6–8 hours or overnight before stacking.
Decorating Ideas
- Ombre green icing shades (see recipe bellow)
- White icing with green sanding sugar
- Gold sprinkles or edible gold leaf
- Edible gold leaf flakes
- Polka dots and stripes
- Add tiny rainbow details 🌈 (see recipe bellow)
Troubleshooting Guide
Why did my cookies spread?
- Dough wasn’t chilled long enough
- Too much butter
- Baking sheet was warm
Why is my icing cracking?
- Icing too thick
- Overmixed
- Room too dry
How do I get smooth icing?
- Use a toothpick or scribe tool
- Gently tap cookie on counter to release air bubbles
Why is my icing too runny?
- Too much water added
- Fix: Add more powdered sugar 1 tablespoon at a time
Storage Tips
- Store undecorated cookies in airtight container up to 5 days
- Decorated cookies last 4–5 days at room temperature
- Freeze undecorated cookies up to 3 months
FAQ
Can I make these ahead of time?
Yes! Bake cookies 1–2 days ahead and decorate the next day.
Can I freeze decorated cookies?
It’s best to freeze undecorated cookies. Royal icing can become sticky when thawed.
Can I make this without meringue powder?
Yes, but icing won’t harden as firmly. Meringue powder gives that professional finish.
Can I flavor the icing?
Absolutely! Lemon, almond, or even mint extract works beautifully.
Variations
- Add lemon zest to cookie dough
- Add peppermint extract for a minty twist
- Use white icing and pipe shamrock details on round cookies
- Turn into cookie pops with lollipop sticks
How to create Ombre Finish?
✨ Method 1: Wet-on-Wet Royal Icing (Best for Smooth Blend)
This gives you that seamless, soft gradient.
What You Need:
- Flood-consistency royal icing
- 2–3 shades of green (light, medium, dark)
- Toothpick or scribe tool
How To Do It:
- Outline the cookie with thicker icing.
- Flood the cookie with your lightest green.
- While it’s still wet, pipe a line or small sections of darker green near:
- The base of the shamrock
- The center
- One side for shadow effect
- Use a toothpick to gently drag the darker color into the lighter color using small swirl or zig-zag motions.
- Tap the cookie lightly on the counter to smooth.
💡 Pro Tip: Work quickly! The icing must stay wet to blend properly.
✨ Method 2: Two-Tone Piping Bag (Easiest + Super Clean)
This creates a natural gradient automatically.
How To Do It:
- Place plastic wrap on the counter.
- Pipe a strip of dark green icing down one side.
- Pipe light green icing next to it.
- Roll it up into a log and place into your piping bag.
- When you pipe, the colors naturally blend as they flow out.
This gives you that soft, bakery-style ombré look with almost no effort.
✨ Method 3: Layered Flooding (For Defined Gradient)
If you want a more defined ombré (like darker at bottom fading upward):
- Flood the bottom third with dark green.
- Flood the middle with medium green.
- Flood the top with light green.
- Use a toothpick to gently blend only where the colors meet.
Extra Tips for That Gorgeous Finish
- Gel food coloring works best (liquid makes icing too thin).
- Add just a touch of white to soften darker green tones.
- Let cookies dry fully (6–8 hours) before stacking.
- Sprinkle sanding sugar while icing is still wet for that sparkly effect ✨
How to create High-end Bakery finish?
✨ 1. Gold Accent Technique (Elegant + Luxe)
This is what gives that “professional cookie artist” look.
Option A: Edible Gold Paint (Most Dramatic)
What You Need:
- Edible gold luster dust
- Clear extract (vodka, lemon extract, or almond extract)
- Small food-safe paintbrush
How To Do It:
- Let royal icing dry completely (at least 8 hours).
- Mix a small amount of gold luster dust with a few drops of extract.
- You want a paint-like consistency.
- Lightly brush:
- Edges of shamrock leaves
- Small dots
- Vein lines in the leaves
- The stem for a metallic pop
💡 The alcohol evaporates quickly, leaving pure gold shine.
Option B: Gold Splatter (Modern Look)
- Mix gold luster dust with extract (slightly thinner).
- Dip a brush in the mixture.
- Tap the brush against another brush over the cookies.
- You’ll get a delicate gold speckle effect.
This looks AMAZING on darker green ombré cookies.
Option C: Gold Dragees (Easy + Elegant)
Place 1–3 gold sugar pearls strategically in the center of each shamrock while icing is still wet.
Less is more here — it keeps it classy.
🌈 2. Rainbow Swirl Tutorial (Playful & Eye-Catching)
Perfect for that “pot of gold” vibe.
Method: Wet-on-Wet Swirl
You Need:
- White flood icing
- Small piping bags with red, orange, yellow, green, blue icing
Steps:
- Flood cookie with white icing.
- Immediately pipe thin curved lines of each rainbow color.
- Take a toothpick and drag through the lines in one direction (top to bottom).
- Then drag back the opposite direction.
You’ll get a beautiful marbled swirl.
Rainbow Leaf Accent (Super Cute for Shamrocks)
Instead of filling the whole cookie:
- Flood shamrock in green.
- Add a small rainbow arc on one leaf while icing is wet.
- Add tiny gold sprinkles at the end like a “pot of gold.”
It’s adorable😉
💎 3. Bakery-Level Glossy Secret
This is the one that makes cookies look professional.
Secret #1: Proper Icing Consistency
Flood icing should:
- Disappear back into itself in 10–15 seconds when you drag a knife through it.
- Not be watery.
- Not hold stiff peaks.
Too thick = dull finish.
Too thin = craters.
Secret #2: Let Them Dry Undisturbed
- Dry at room temperature.
- No fans blowing directly on them.
- No fridge (humidity ruins shine).
- 8–12 hours is ideal.
Fast drying can cause cracking.
Secret #3: Corn Syrup Trick (Tiny Boost)
Add ½ teaspoon light corn syrup to your royal icing.
It:
- Adds subtle shine
- Helps prevent cracking
- Gives that smooth bakery gloss
Do NOT add too much or it won’t fully harden.
Secret #4: Light Steam Finish (Advanced Trick)
Once icing is completely dry:
- Hold cookie briefly over a kettle with light steam.
- Just 1–2 seconds.
It slightly melts the surface and enhances shine.
⚠️ Do NOT overdo it — too much steam causes bleeding.
OK, now you know all my cookie decorating secrets 😉 If you make these Shamrock Sugar Cookies, I’d love to see them! 💚 Leave a comment below, tag your photos on Pinterest, and let me know how you decorated yours. Did you go classic green or full rainbow magic? 🍀✨
Please see more amazing recipes:
Leave a Reply