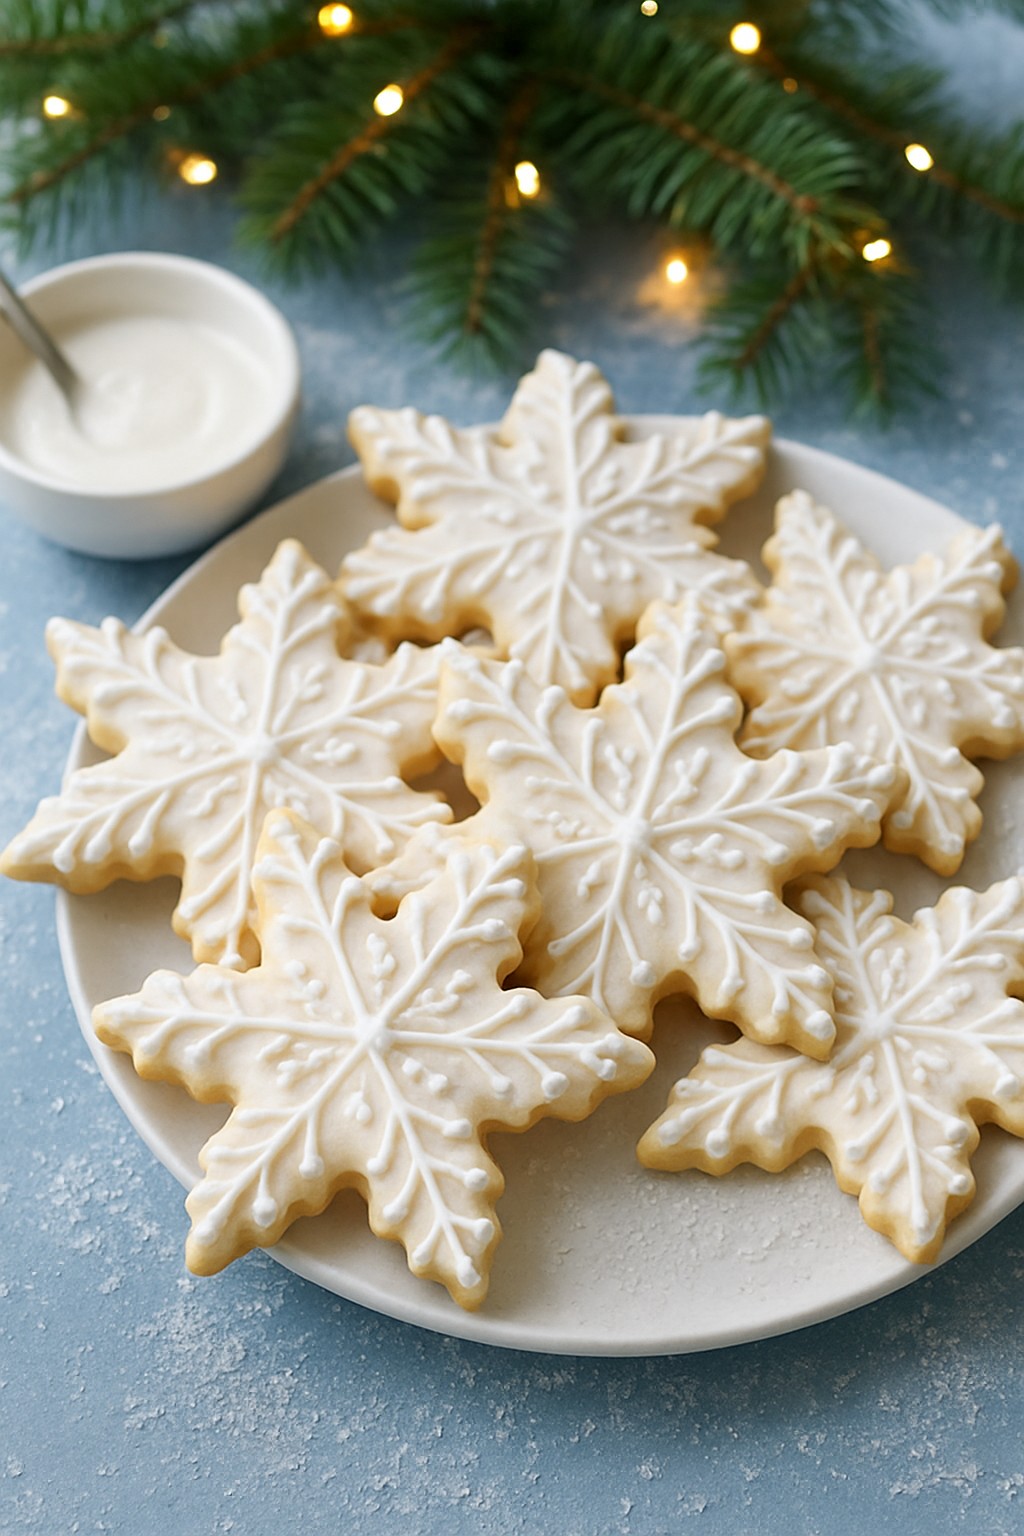
❄️ Snowflake Sugar Cookies with Royal Icing

Delicate, elegant cookies that look like edible winter art
🎄 Introduction
These Snowflake Sugar Cookies with Royal Icing are a true Christmas showstopper. Crisp yet tender sugar cookies are cut into beautiful snowflake shapes and decorated with glossy white royal icing, creating delicate designs that look just like real snowflakes.
They’re perfect for Christmas cookie platters, gifting, decorating parties, or simply enjoying with a warm mug of cocoa. Each cookie is unique, just like a real snowflake — and that’s part of the magic!
⭐ Why You’ll Love This Recipe
- Stunning winter and Christmas presentation
- Classic sugar cookie flavor everyone loves
- Royal icing dries smooth and shiny
- Perfect for gifting and cookie boxes
- A wonderful creative baking project
🍪 Ingredients
Sugar Cookies
- 2 ¾ cups all-purpose flour
- ½ tsp baking powder
- ¼ tsp salt
- 1 cup unsalted butter, softened
- 1 cup granulated sugar
- 1 large egg
- 2 tsp vanilla extract
- ½ tsp almond extract (optional but lovely)
Royal Icing
- 3 cups powdered sugar, sifted
- 2 tbsp meringue powder
- 5–6 tbsp warm water
- ½ tsp vanilla extract
- Cookie Sheets (2)
- Measuring cups / spoons
- Bowl
- Large bowl
- Whisk
- Electric mixer
- Rolling pin with 1/4-inch spacer
- Snowflake cookie cutter
- Piping bag with tip
- Cooling wire rack
🧁 Instructions
Make the Sugar Cookies
- In a bowl, whisk flour, baking powder, and salt.
- In another bowl, cream butter and sugar until light and fluffy using electric mixer.
- Beat in egg, vanilla, and almond extract.
- Gradually add dry ingredients and mix until dough forms.
- Divide dough into two discs, wrap, and chill at least 1 hour.
- Preheat oven to 350°F (175°C).
- Roll dough to ¼-inch thickness on a floured surface.
- Cut with snowflake cookie cutters.
- Bake 8–10 minutes, until edges are set but not browned.
- Cool completely before decorating.
Make the Royal Icing
- Beat powdered sugar and meringue powder.
- Add water gradually until thick but pipeable.
- Stir in vanilla.
- Divide icing into bowls:
- Thick icing for outlining
- Thinner icing for flooding
Decorate the Snowflake Cookies
- Pipe an outline around each cookie.
- Flood with thinner icing.
- Use a toothpick to create snowflake patterns:
- Lines
- Dots
- Branches
- Sprinkle with edible glitter or pearl sprinkles if desired.
- Let cookies dry 6–8 hours until fully set.
✨ Tips for Perfect Snowflake Cookies
- Chill dough before and after cutting for sharp edges
- Keep designs simple — snowflakes shine with minimalism
- Use white-on-white for an elegant look
- Add shimmer with edible glitter or pearl dust
- Let icing dry completely before stacking

🎨 Design Ideas
- Classic white snowflakes
- White with silver accents
- Pale blue outlines
- Add tiny sugar pearls for sparkle
- Drip-style modern snowflakes
🎁 Storage
- Store in an airtight container up to 5 days
- Decorated cookies are perfect for gifting
- Stack with parchment between layers
Royal Icing Consistency Chart (Easy Guide)
Royal icing consistency is the key to clean lines and flawless snowflake details. Use this chart to get it right every time.
1. Stiff Consistency (Flowers & 3D Details)
Texture: Thick, holds peaks
Test: Lift your spoon — icing stands straight up
Best for:
- Piped flowers
- Raised dots
- Snowy texture accents
💧 Add very little water, if any
2. Piping Consistency (Outlining & Fine Details)
Texture: Soft toothpaste
Test: Drag a knife through — line disappears in 20–25 seconds
Best for:
- Cookie outlines
- Snowflake arms
- Intricate lace patterns
- Writing and fine lines
💧 Add water ½ teaspoon at a time
3. Flood Consistency (Filling Cookies)
Texture: Honey or shampoo
Test: Line disappears in 10–15 seconds
Best for:
- Filling outlined cookies
- Smooth, glossy finishes
- Base layer for snowflake cookies
💧 Add water slowly — icing changes fast!
4. Super-Flood Consistency (Advanced / Optional)
Texture: Very runny
Test: Line disappears in 5–8 seconds
Best for:
- Ultra-smooth finishes
- Marbling techniques
⚠️ Use sparingly — can overflow easily
Pro Tips for Perfect Snowflake Cookies ❄️
- Always outline first, then flood
- Let flooded cookies rest 10–15 minutes before adding details
- Use piping consistency for white-on-white snowflake designs
- If icing spreads too much → add powdered sugar
- If icing is too thick → add water drop by drop
Quick Visual Summary
- Stiff → stands tall
- Piping → lines hold shape
- Flood → smooth & glossy
- Super-flood → ultra-fluid
❄️ Royal Icing Troubleshooting (Quick Fixes)
Icing too runny?
→ Mix in powdered sugar 1 tablespoon at a time until thickened.
Icing too thick or hard to pipe?
→ Add water a few drops at a time, mixing well between each addition.
Flood icing spilling over edges?
→ Your outline is too thin or your flood icing is too loose. Thicken slightly and let outlines dry 1–2 minutes before flooding.
Air bubbles in icing?
→ Gently tap the cookie on the counter or pop bubbles with a toothpick.
Icing drying dull or cracked?
→ Icing may be overmixed or too dry. Mix gently and avoid adding too much powdered sugar.
Details melting into the base layer?
→ Let the flooded cookies dry 10–20 minutes before adding details.
🍪 Common Royal Icing Mistakes (and How to Avoid Them)
Adding too much water at once
Royal icing changes fast — always add liquid drop by drop.
Skipping the outline step
Outlines create a barrier and keep cookies neat and professional looking.
Decorating warm cookies
Cookies must be completely cool before icing or it will melt and spread.
Overworking the icing
Too much mixing can add air bubbles and dull the finish.
Stacking cookies too soon
Royal icing needs 6–8 hours (or overnight) to fully set.
Overdecorating snowflake cookies
Snowflakes shine with simple, delicate designs — less is more!
❄️❄️ Kid-Friendly Snowflake Cookie Decorating Tips
Decorating snowflake cookies is a wonderful Christmas activity for kids! Keep it simple, fun, and mess-friendly with these easy tips.
👧👦 How to Set Kids Up for Success
- Use squeeze bottles instead of piping bags for easier handling
- Stick to one icing color (white works best for snowflakes!)
- Place cookies on parchment or wax paper for easy cleanup
- Give each child 3–4 cookies at a time to avoid overwhelm
🎨 Easy Decorating Ideas for Kids
- Dot designs – dots around the edges or center
- Simple lines – straight lines from the center outward
- Sprinkle snow – add sprinkles or pearls right after flooding
- Pearl placement – let kids place sugar pearls like jewels
✨ Tip: Snowflakes don’t have to be perfect — real ones aren’t either!
❄️ Make It Fun (and Stress-Free)
- Let kids decorate after cookies are outlined and flooded
- Encourage creativity — no two snowflakes should look the same
- Praise effort over perfection
- Turn it into a holiday tradition with music and cocoa
🎄 Safety & Cleanup Tips
- Use edible decorations only
- Keep paper towels nearby for sticky fingers
- Aprons or old shirts = happy parents
List of Kid-friendly Christmas Recipes:
- COOKING WITH KIDS (little helpers) recipe Collection (kid-friendly activities)
- Chocolate-Dipped Candy Canes (with kid-friendly decorating section)
- White Chocolate Holiday Popcorn (kid-friendly activity)
- Snowman Marshmallow Pops (kid-friendly activity)
- Edible Gift Jars (kid-friendly activity)
- Holiday Stuffed Mushrooms (kid-friendly activity)
- Chocolate Peppermint Mousse Cups (kid-friendly activity)
- Hot Cocoa Thumbprint Cookies with Marshmallow Frosting (kid-friendly activity)
- List of Santa’s Favorite Christmas Cookies
🖨️ Printable Snowflake Cookie Decorating Party Checklist
(Perfect for printing or saving as a PDF)
❄️ Before You Start
☐ Bake and fully cool sugar cookies
☐ Prepare royal icing (outline + flood)
☐ Outline and flood cookies
☐ Let cookies set 10–20 minutes
🎨 Decorating Supplies
☐ Squeeze bottles or piping bags
☐ Toothpicks or scribe tool
☐ Sugar pearls
☐ Sprinkles or edible glitter
☐ Parchment or wax paper
☐ Paper towels or wipes
👧👦 Kid Setup
☐ Aprons or old shirts
☐ Small decorating station per child
☐ 3–4 cookies per child at a time
☐ Holiday music & snacks
❄️ After Decorating
☐ Let cookies dry 6–8 hours
☐ Store in airtight container
☐ Stack with parchment between layers
☐ Enjoy or gift proudly! 🎁
Please see more of our amazing recipes:
- The BEST Christmas Cookies
- Christmas Morning Cinnamon Rolls with Vanilla Bean Icing
- Chocolate Cherry Babka
- Snowman Marshmallow Pops
- Edible Christmas Gift Jars
- Christmas Snow Globe Cupcakes
- Gingerbread Bundt Cake with Orange Glaze
- Bread Pudding with Rum Sauce (or Eggnog Sauce)
Please leave a review, and share the recipe with friends to spread Christmas joy.
Merry Christmas!
Leave a Reply