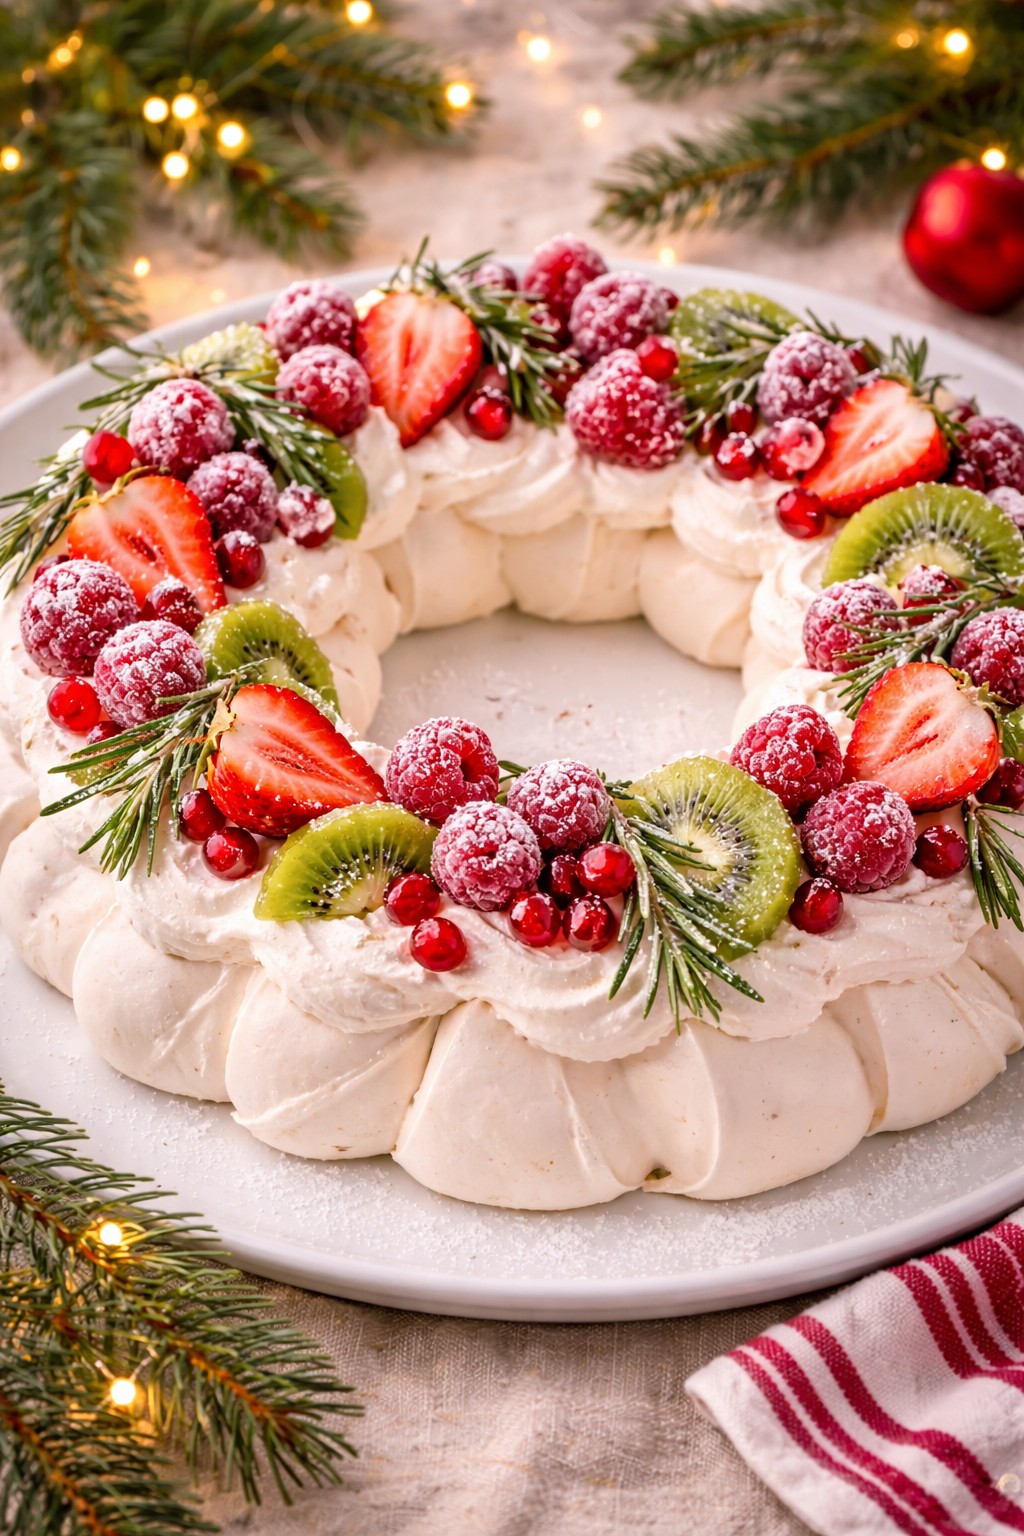
🎄 Christmas Pavlova Wreath

This Christmas Pavlova Wreath is a show-stopping holiday dessert that looks like a snowy wreath straight from a winter wonderland. With a crisp meringue shell, soft marshmallow center, fluffy whipped cream, and jewel-toned fruit, it’s as beautiful as it is delicious.
Perfect for Christmas dinner, parties, or when you want a dessert that truly wows.
❤️ Why You’ll Love This Recipe
- Stunning holiday centerpiece
- Light, airy, and not too sweet
- Naturally gluten-free
- Can be made ahead
- Customizable with seasonal fruits
🛒 Ingredients
☁️ Pavlova Meringue
- 4 large egg whites, room temperature
- 1 cup (200 g) superfine sugar
- 1 tsp cornstarch
- 1 tsp white vinegar or lemon juice
- 1 tsp vanilla extract
- Pinch of salt
🤍 Whipped Cream
- 1 ½ cups heavy whipping cream, cold
- 2–3 tbsp powdered sugar
- 1 tsp vanilla extract
🍓 Festive Toppings
- Fresh strawberries, sliced
- Fresh raspberries
- Pomegranate arils
- Kiwi slices
- Fresh rosemary or mint (for garnish)
- Optional: sugared cranberries
👩🍳 Instructions
1. Prep
Preheat oven to 300°F (150°C). Line a baking sheet with parchment paper.
Draw an 8–9 inch circle, then draw a smaller 4–5 inch circle inside to form a wreath guide.
2. Make the Meringue
Beat egg whites with salt until soft peaks form using an electric mixer.
Gradually add sugar, 1 tablespoon at a time, beating until thick, glossy, and stiff peaks form.
Gently fold in cornstarch, vinegar, and vanilla.
3. Shape the Wreath
Spoon meringue onto the circle, shaping into a wreath with a well in the center. Create swirls for texture.
4. Bake
Place in oven and immediately reduce temperature to 250°F (120°C).
Bake for 90 minutes. Turn oven off and let pavlova cool completely inside with door slightly ajar.
5. Whip Cream
Beat cream, powdered sugar, and vanilla until soft peaks form using an electric mixer.
6. Decorate
Just before serving, fill the center of the wreath with whipped cream and top with fruit and garnishes.
✨ Tips for Perfect Pavlova
- Use clean, grease-free bowls and beaters
- Add sugar slowly for stability
- Don’t open oven while baking
- Cool completely to prevent cracks
- Assemble right before serving

🎄 Make-Ahead Tips
- Bake pavlova up to 2 days ahead and store in an airtight container
- Whip cream and prep fruit the day of
- Assemble just before serving for best texture
🔄 Variations
- Add lemon curd under the cream
- Use cranberry-orange compote
- Chocolate drizzle for contrast
- Tropical version with mango & passionfruit
📦 Storage
Best enjoyed the day it’s assembled.
Leftovers can be refrigerated for up to 24 hours, though meringue will soften.
🎄 Topping Combos for Your Pavlova Wreath
Mix and match for different holiday vibes!
🍓 Classic Christmas Berry
- Strawberries
- Raspberries
- Sugared cranberries
- Pomegranate arils
- Rosemary sprigs
✨ Red, white & green perfection!
🍊 Cranberry Orange Bliss
- Fresh orange segments
- Cranberry compote or whole cranberries
- Orange zest
- Mint leaves
✨ Bright, citrusy, and festive.
🍫 Chocolate Cherry Indulgence
- Chocolate shavings or curls
- Fresh or jarred cherries
- Mini chocolate chips
- Cocoa dusting
✨ Rich and decadent for chocolate lovers.
🥭 Tropical Holiday Twist
- Mango slices
- Kiwi
- Pineapple
- Passionfruit pulp
✨ A sunny escape in the middle of winter!
🍋 Lemon Curd Dream
- Lemon curd swirled into cream
- Blueberries
- Raspberries
- Candied lemon peel
✨ Tangy and fresh to balance sweetness.
❄️ Decorating Ideas for a Show-Stopping Wreath
Make your pavlova look like a snowy Christmas wreath!
🎀 Sugared Fruit – Roll cranberries, raspberries, or rosemary in sugar for a frosted look.
🌿 Herb Sprigs – Use rosemary or mint to mimic evergreen branches.
✨ Edible Gold or Silver Dust – Lightly brush on fruit or meringue for sparkle.
🍓 Color Clusters – Group fruits in small clusters for a natural wreath effect.
🤍 Swirled Cream – Pipe or spoon cream in soft peaks for texture.
❄️ Snowy Finish – Dust lightly with powdered sugar just before serving.
🎄 Holly Look – Raspberries + mint = instant holly leaves and berries.
🍫 Chocolate Drizzle – Add thin drizzles for contrast and elegance.
📸 Styling Tip for Photos
Decorate in sections rather than evenly — it gives a more organic, wreath-like look and makes every slice photo-worthy!
🍽️ Serving & Slicing Guide for Pavlova Wreath
✔️ When to serve:
Serve pavlova shortly after decorating for the best contrast of crisp shell and marshmallow-soft center.
✔️ How many it serves:
A standard wreath pavlova serves 8–10 people, depending on slice size.
✔️ Best tools:
Use a sharp knife or serrated cake knife. Wipe it clean between cuts for neat slices.
✔️ Where to cut:
Slice just like a cake, cutting between decorations or fruit clusters to keep each piece pretty.
✔️ Gentle pressure:
Let the knife do the work — the shell will crack naturally. Avoid pressing straight down.
✔️ Lifting slices:
Use a cake server or wide spatula to lift each slice, supporting the soft center.
✔️ If it cracks:
No worries! Pavlova is meant to crack — it’s part of its rustic charm.
✔️ Individual portions option:
For a party, you can break the wreath into rustic portions instead of perfect slices for a relaxed, festive look.
✨ Serving Tip:
Add an extra spoonful of whipped cream and a few fresh berries to each plate for a bakery-style finish.
If you’d like, I can also write a short “How to Transport Pavlova” tip box — it’s a lifesaver for holiday gatherings!
⏰ Make-Ahead & Storage Tips
✔️ Make the meringue ahead:
Bake the pavlova wreath up to 1–2 days in advance. Let it cool completely in the oven, then store in an airtight container at room temperature.
✔️ Store in a dry place:
Keep away from humidity and the fridge — moisture will make it sticky and soft.
✔️ Prep toppings early:
You can wash and slice fruit and whip cream a few hours ahead. Store separately in the fridge until ready to assemble.
✔️ Assemble close to serving:
For best texture, decorate the pavlova within 1–2 hours of serving.
✔️ Leftovers:
Once assembled, leftovers can be refrigerated for up to 24 hours, but expect the meringue to soften — still delicious!
✔️ Freezing:
Plain, undecorated pavlova can be frozen for up to 1 month. Thaw at room temperature in a dry spot before decorating.
✨ Best Advice:
Think of pavlova as a beautiful last-minute dessert — bake ahead, decorate fresh, and wow your guests!
🚗 How to Transport a Pavlova Wreath Safely
✔️ Transport undecorated if possible:
For best results, move the plain pavlova shell and decorate it at your destination.
✔️ Use a sturdy base:
Place the pavlova on a flat cake board or platter that fits snugly in your box or container.
✔️ Choose the right container:
A deep cake carrier or large box lined with non-slip mat or a damp paper towel underneath helps prevent sliding.
✔️ Keep it cool & dry:
Avoid heat and humidity. Do not refrigerate the plain shell — condensation can make it sticky.
✔️ Decorated pavlova:
If already topped, refrigerate briefly to firm the cream, then transport in a cooler with ice packs, making sure the dessert stays level.
✔️ Drive carefully:
Keep it on a flat surface in the car (like the trunk or footwell) and avoid sudden stops.
✔️ Emergency kit:
Bring extra whipped cream, fruit, and mint for quick touch-ups on arrival!
✨ Travel Tip:
Even if it cracks on the road, a swirl of cream and a handful of berries will hide everything — pavlova magic!
🛠️ Pavlova Troubleshooting Tips
❌ Pavlova cracked on top
✔️ Totally normal! Pavlovas are delicate. Cracks won’t affect taste — just cover with cream and toppings.
❌ Collapsed after baking
✔️ Usually from sudden temperature changes or underbaking. Let it cool slowly in the oven with the door slightly open.
❌ Too soft or chewy all through
✔️ It may be underbaked. Pavlova should be crisp outside and marshmallow-soft inside. Bake longer at low heat next time.
❌ Brown or yellow meringue
✔️ Oven was too hot. Keep the temp low and avoid using convection if it runs hot.
❌ Weeping or sticky beads on surface
✔️ Caused by humidity or sugar not fully dissolved. Make sure sugar is completely dissolved before baking and store in a dry place.
❌ Gritty texture
✔️ Sugar wasn’t dissolved. Rub a bit of meringue between fingers — it should feel smooth before baking.
❌ Meringue won’t form stiff peaks
✔️ Bowl or whisk may have grease or yolk residue. Use clean, dry equipment and fresh egg whites.
❌ Pavlova sticks to parchment
✔️ Let it cool completely before removing. A thin spatula helps release it gently.
❌ Softens quickly after decorating
✔️ Pavlova absorbs moisture from cream and fruit. Assemble just before serving (or within 1–2 hours).
✨ Quick Tip:
Pavlova is forgiving — even “imperfect” ones look stunning once topped and taste absolutely magical!
Please try our other delicious recipes:
Please leave a review, and share the recipe with friends to spread Christmas joy.
Merry Christmas!
Leave a Reply